Saturday, June 30, 2012

Spooky Hallows pattern giveaway begins!!!

I've completed the first step on all the patterns and created this faux quilt via EQ7.  Now I can begin the pattern giveaway.  First on the list is "Spooky Boot with Frog", the top left block.  I have also posted the Supply List.   Just click the red words and the picture below.  I will be posting a new block pattern every two weeks so I should be back on by July 11th and then July 25th.   I will be following the quilt along the top row first.  So next will be "Spooky Skull with Spider".
Please note that the patterns are only 63% of desired pattern size.  It was necessary to reduce them to fit onto standard 11 x 8.5 paper for PDF files.  Just make a copy of the pattern and take it to a copy company and have it increased by 159% and printed.  This message is included on all block patterns.

I will not be sharing how to's on applique as there is a number of great online sources for tutorials on applique.  Here is one of the best  http://erinrussek.typepad.com/one-piece-at-a-time/applique-lessons/ .  Erin's methods are very, very close to mine.  I don't use plastic template sheets for my templates.  I use plain old freezer paper tripled for a nice solid template. They are much easier to cut.  I also pre-shrink the freezer paper to reduce shrinkage during the applique process.  Just lay sticky side down on your ironing board and lightly spritz with water, press after a minute. It will crinkle a little but this should not be a problem.  If you are using this method of making templates be sure to make the templates reversed.  Simply lay your paper layout on your light source upside down then trace you pattern pieces.  That way you can iron the templates to the back of the fabric being used and it doesn't move.  Just cut around template using a scant 1/4" seam allowance.  

Another thing to notice is that the Cat's eyes are done in reverse applique.  That means that the cat is appliqued to the eye fabric.  This method is actually more accurate and helps the eyes to recede as they should.  I have not done the embroidery work and any of the blocks.  Actually this is the only block sewn done.  The rest are only glued down.  I will be sewing them before posting (I hope).

I think I have covered everything.  If you have any questions just leave a post on this blog and I will try and reply promptly.  

Spooky Halloween begins!!!
Marjory

Friday, June 29, 2012

Penguin Quilt

Several people have asked where I downloaded the pattern for the penguin block on the internet.  For some reason it no longer comes up when doing a search.  I am therefore posting the ones I made in EQ7 from the free one that I downloaded.  It was never more than a line drawing so you will have to grab a piece of graph paper or draw it in EQ7 as I did.  It really is a basic 9 patch with the use of half square triangles and corner triangles.  Therefore it would be best to design your block making sure that the dimensions are divisible by three.  Mine are for a small quilt so they are 3" finished.
I decided to post the colored versions for clarity in what the block looks like.
The original design split the white into two patches.  I chose to make them one. The corner patches are all from side center to adjoining side center.  Some have two corner patches and one has just one.    The wings are just half square triangles.
This is a variation on the original block.  Split the head patch in half and then the bottom patch should be split in half a second time.  Add corner patches to create the beak to these split patches.

To make it all really clear click on each picture and you will be taken to a private link and surprise.  Don't be afraid if one of them doesn't have a preview download it and the right file pops up.  I'm not sure of the finished sizes on these files but you can ajust that with any printer.  You may have to print the file as is then reduce it.

Happy quilting!!!
Marjory 

Sunday, June 3, 2012

Free Applique: Fluttering Block IV

I'm behind as usual.  Sorry folks.  I just fell apart about sewing while I was sewing machineless.  No excuses just a lack of interest since I couldn't sew.  So I took up knitting beaded bags again and caught up on my gardening.  Just click the picture and it will take you to the free PDF file.

If there are any ideas what kind of applique/embroidery pattern you would like to start next let me know.  I'm apt to continue with my applique Halloween quilt that I started and never finished.  Here's a sneak peek:  http://peckspieces.blogspot.com/2011/08/design-wall-monday.html  I have since changed the color of the witches boot and it now shows up better.

These 9 quilt blocks measure 12" x 16".  and will make a great holiday quilt. If you love Halloween as much as I do this is the quilt project for you. I haven't worked out the entire setting but that's half the fun of doing a quilt.  I've already designed all the blocks and have 3 ready to applique.  That means there will be color photos to share of each block.

I can post two a month so we could all finish this cute quilt by the end of October.  So I guess that's the plan.  Then we can move on to my other applique quilt that I have had designed but never even started.  It is a great floral quilt that I hope you will all love.  Lol , I have more designs than time.  I will start posting "Spooky Times"  series starting this coming week.  Then if all goes well I will post every two weeks with another block.  Then will finish the setting and quilting in October.  Sound good?  

Halloween is here!!!!
Marjory

Friday, May 18, 2012

Can nightmares become quilts?


Amy's Creative Side

I just found this virtual quilt show, The Bloggers' Quilt Festival at Amy's Creative Side.  What a great idea! What fun we will have checking out each others blogs along with great quilts!  I decided to enter a quilt that means very much to me.  It is a joint effort between my mother, June P. Brennan and myself.
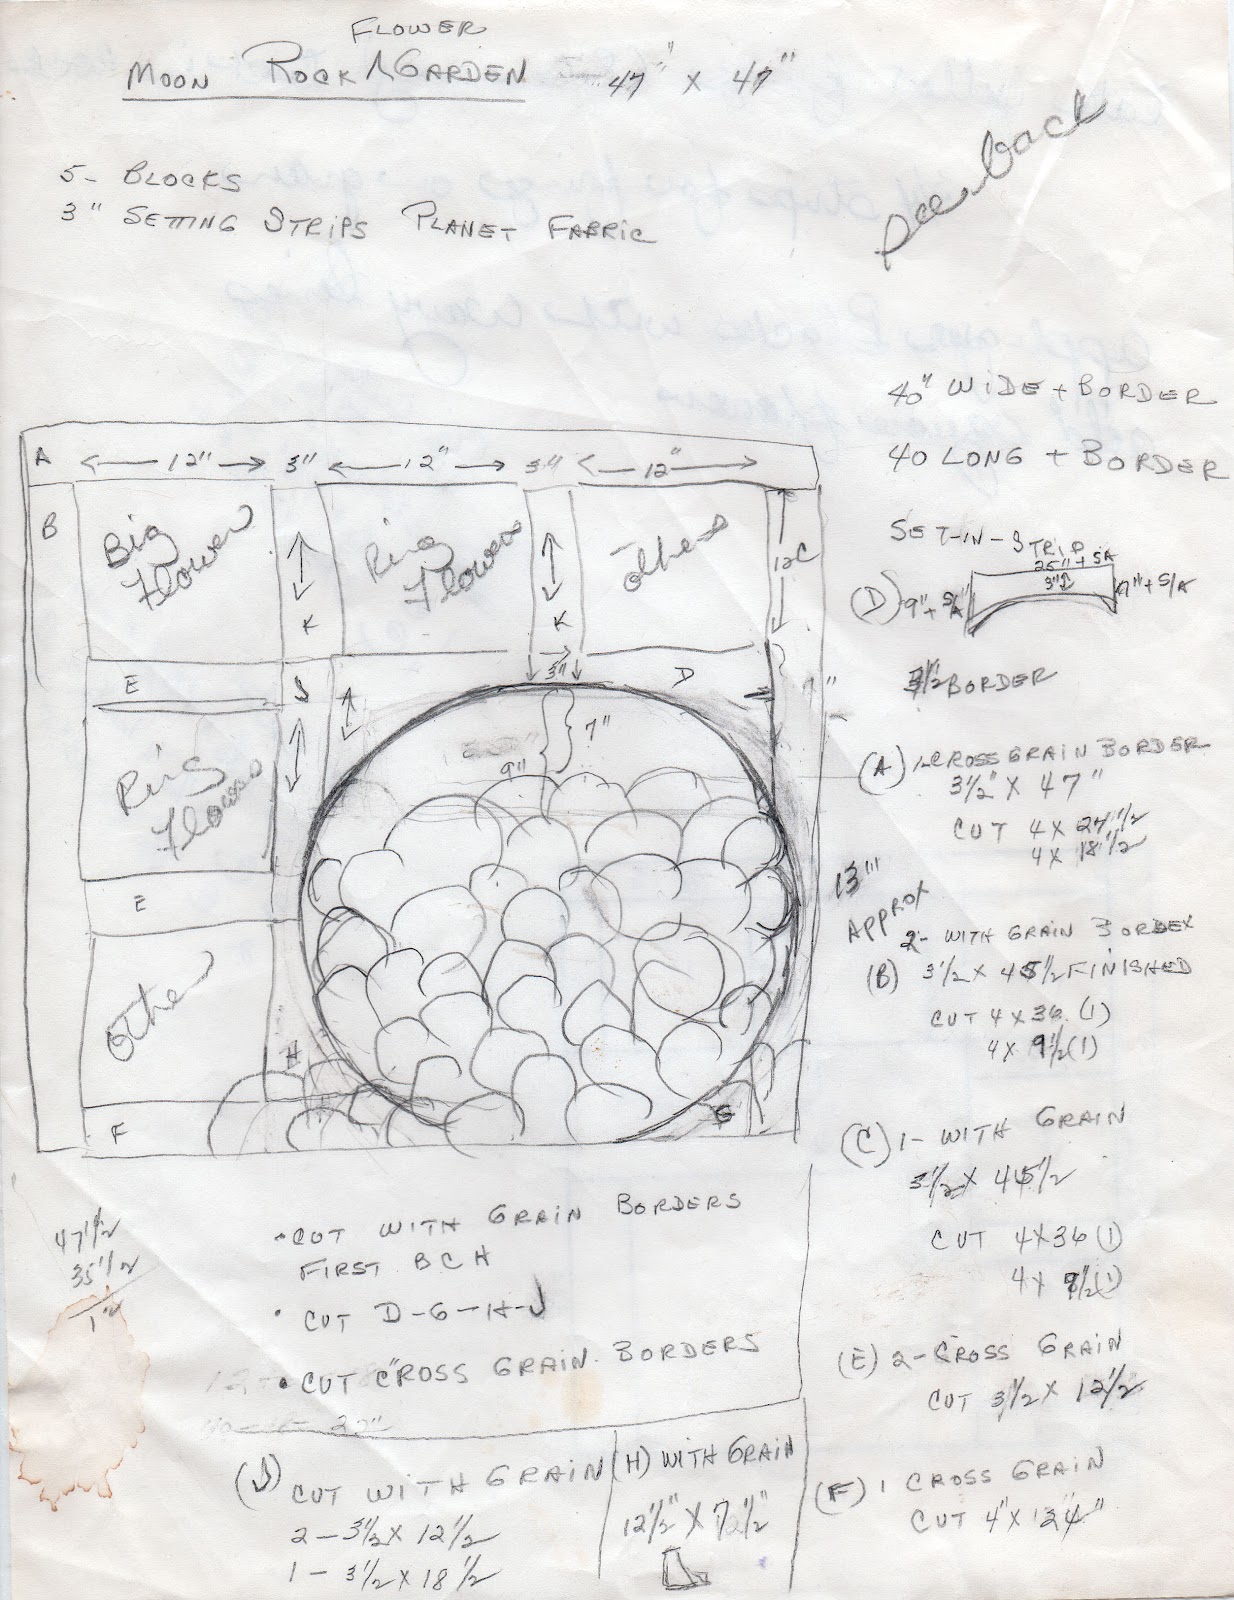
My mother was a  very traditional quilter who loved Baltimore album applique.  She was known for designing her own little quilts in the Baltimore style.  For several months she was plagued with nightmares revolving around a "Moon Rock Garden".  She called it a nightmare because it was in a style she basically didn't enjoy.  The nightmare continued to plague her until she finally started putting the images down on paper.  She had a basic outline of the finished quilt and had made the flower blocks.  Here is her pencil drawing/map of this quilt.
As you can see she was going to make the rocks round.  She got stuck with this quilt because the rocks just weren't working.  In the box with the fabric went the quilt.  How many times have we all done that?!  The quilt stayed in that box for years because before she could figure out how to finish it, she went legally blind.

After going blind she wanted to sort out her sewing room and unfinished projects so a few of us flew in and a few dropped over.  My daughter and I flew in and my sisters dropped over.  The object of the trip was to go through everything, then my daughter and I would load up a Uhaul and take the entire fabric collection, patterns and quilting tools back to her house in Colorado.  At this time I lived in Arizona and she lived in Colorado, so we flew in separately as close to the same arrival time as possible into LAX. 

We all split up the unfinished quilts and there were a few quilts we all wanted.   But when it came to Mom's "Moon Rock Garden" box, my mom says, "That's Marjory's".  No discussions, no debates, just it's mine.  Now I'm not a traditional quilter, nor am I a total art quilter.  I'm stuck somewhere between them.  I saw the blocks my mom called non traditional as traditional.   What was I going to do to finish this quilt that I didn't even like?

Well, it sat in my studio in the box and I showed it to all my quilting friends.  Everyone said  "You can do it!  It will come to you."  Ughh!!  Well, it did come to me on a trip to visit the family for the holidays.  Rocks aren't round.  That's what was bothering me about Mom's design.  I had several drawings of great rock formations that I had drawn while living in Colorado.  Out they came and I played with them until I was happy with the design.  The second problem I had with Mom's design was that the cream background on the flower blocks would be "Bulls Eyes"  with the other fabric.  Mom had the moon so dark that it disappeared into the space fabric.  So I actually added some of my own fabric and used the background fabric from the flowers to make the moon.   In this way I tied in the flower blocks with the moon section of the quilt but I kept to the flavor of the original quilt. 

Now comes the flowers in the moon section.  Mom wanted 3D flowers different from the ones she had already made but in the same style.  Basically braking all "Mother Natures"  rules on this planet.  Mom had given me not only all the extra fabrics but pieces of 3D flowers that hadn't worked out.  The little orange flowers are made from those spare parts.  I had it quilted by a friend of a friend, Gale Smith.  When I got it back from the quilter I felt that the flower blocks needed some help.  I'm a big believer that more is just MORE!!!!  So I added more bling by way of beads, broaches and iron on crystals.  It is now over the top and I love it!!!  It hangs in my livingroom  to remind me of my mom (now deceased) and a wonderful trip I shared with my daughter.  

My mom did get to see the quilt before she died.  She had to get very close to see it but she knew it was done and she liked it.  I told her I had to change the rocks because they just didn't work.  I quote her, "Why do you think I gave it to you?  It wasn't working and I knew you could fix it."  That's my Mom.  I miss you Mom,  I have no one to argue quilting with now!!!  
Here is Mom with her grandson's before she went blind.  

Keep on Quilting!!!
Marjory


Sunday, May 13, 2012

Knitted Beaded Amulet Bags


Sorry for having been gone so long.  My sewing machine broke down and I've been waiting for to find out what was wrong with it.  In the meantime my BFF in Texas sent me her old Bernina.  I haven't tried very hard yet to get to know it.  In the meantime I'm lost without my machine.  Can't even think straight.  LOL

I've gotten caught up on some gardening while out of commission and my BFF Phoenix helped me to start cleaning up the stock room so that I could move my office to share the space.  This room is much bigger and cooler, with large windows facing my back garden.  With the view and the sounds from my fountains it is a very peaceful place.  I would show you pics but in the process of moving everything around my BFF Phoenix was told that his back surgery was upgraded to the following week.  Therefore we never completed the room  Oh well if it was meant to be it would have been finished before he received the call.  

I haven't been idol.  I've had some beaded amulet bags that I've been meaning to finish and some more to complete the knitting.  So while I was sitting in the hospital keeping my BFF Phoenix company I knitted several bags.  Then when his sisters saw what I was doing they asked if I could sell them one.  I ended up selling five.  LOL
   
Come on over to Flickr to see the rest of the bags I've completed so far.  I've several knitted but still need to do the finishing to make them necklaces.  If the bags aren't on the first page just check out the Crafty Stuff Set to the right.

Knitting is peacefull!!!
       Marjory

Sunday, February 12, 2012

Free Applique Pattern series: Fluttering, Block III

It's time for the next block in the Fluttering series. Just click the picture and it will take you to the downloadable PDF file.  I hope you enjoy making this block weather in applique or embroidery.

Sewing is everything!!!
Marjory

Monday, January 30, 2012

Another STUD swap completed and a Pincushion Tutorial


Here is the cute little quilt that I made for 13insanepenguins for the Nov/Dec STUD/Anything goes, swap.  It is made from a free pattern and a variation of that pattern available on the internet from several sources.  These little guys are about 3 1/2" square.  I told her it was just insane to make 13 penguins and I think that's why her name has insane in it.  But it sure was fun and I'm thinking of making one in pink for me.  Should it be hot pink penguins or light pink background?  Have a few more swaps to think about before I begin.  Here is the pincushion I made as an extra for this swap also available as a free tutorial:
Just click the image to be linked to the free PDF. I'm calling this pincushion Winter Star as I feel it looks a little icy.  Have fun with the tutorial and let me know if you make one.

Here is what I received from 13insanepenguins and it will let you know her humor.  She told me to be on the lookout for Oatmeal?  Isn't this great and funny.  After I posted in on Flickr I found out this isn't the first time she's done this.  Talk about going green!!!   Next is a picture of the contents.
That's fabric not wrapping paper, isn't it just great!!  The candies are long gone and were terrific!
Next let's open that fabric wrapped package:
She sure did a terrific job paperpiecing this bueaty.  Isn't it cute and it's PINK!!!!  I love it!!

Here is the quilt I made for QuiltyBee for the STUD/Pets swap.  I was a little disappointed that she only posted one blurry picture of her many pets and it was of a grey cat.  I'm not very fond of grey.  So this is my version of grey.  Take a closer look and you will see that it is periwinkle.  She seems to have liked it though.   Now the quilt I received from her:
A cute simple quilt of pink poodles along with chocolate mint homemade fudge and a cute little notebook.  Last a tin of mints.  That's rusching or gathering on the blue fabric.

Wednesday, December 28, 2011

Free Applique Pattern series: Fluttering, Block II

Fluttering Series continues with Block II.  Just click on the picture to be lead to the PDF file available free. Use these original blocks for applique or embroidery.  

Have fun and enjoy!!
Marjory

Tuesday, December 20, 2011

Scrappy Mug Rug Swap Christmas 2011

This month the mug rug group tried a new kind of swap.  We knew who our swap partners were and we exchanged one on one.  So my partner was Karen@Laughter in Quilts.  She many does piecing and I mainly do applique.  That makes for a great swap, we each received something we love but rarely do. Here is the mug rug  package I received from Karen:
Wasn't I lucky?  Two mug rugs, a pouch and chocolate.  Boy what a great Christmas swap!!!!!  This snowman was her first try at designing her own paper piecing pattern.  Isn't he great!! Then the snowflake, wow oh wow!!!  Love it all.

Here's the mug rug I designed, made and set to Karen:
Since Santa is one of my favorites and Karen told me she loved him too, I took a pattern I already had designed and modified it to fit a standard mug rug.  She loves it!  Which is all I could ask for.  But this isn't all I sent.  Here's the rest:


Another Santa mug rug using Christmas fabrics, a pincushion made to look like a peppermint candy.  I need to make one of those for myself.  Maybe I'll add it to my Pincushion tutorials.  How about that?

Merry Christmas!!!
Marjory

Sunday, December 18, 2011

Green Tamale Day

My great friends, the Rudolfo's, are of Mexican heritage and every year they get together as a family and make red tamales. I am always included in this process. We make them a week or two from Christmas and then they are served on Christmas. This is an all day process but lots of fun. We did these last week and I forgot my camera.

Then they informed me that they were going to do green chili tamales. We did this today and I was smart enough to bring my camera. This was the first time for most of us to make green tamales so we imported more family members that were more knowledgeable. Actually it was much easier then the red tamales. Red tamales include meat, either pork, beef or both which is usually cooked the day before. Both are made using masa but is prepared differently. Red has the red chili sauce added to the masa and the green have creamed corn added. Actually the green are vegetarian and delicious. To keep this post from being over burdened with photos I made a mosaic of 16 of the photos I took that tells the whole story.
This mosaic takes you from preparing the masa to cooking and aftermath of eating tamales.  After making tamales it is traditional to cook a batch and have a feast.  Which was carried out on each of the tamale days.  Now on Christmas we will have both green and red tamales.  

What a great feast!!
Marjory
Related Posts Plugin for WordPress, Blogger...