Wednesday, December 24, 2014

Merry Christmas 2014

It's Christmas Eve and I'm all ready for Santa.  I have the cookies made and Hot Chocolate warmed up.  My stocking isn't hung but it's waiting right next to Santa's treat.  The turkey is thawing and I've already started on the basics for Christmas dinner.  I decided that pumpkin pie could wait until New Years.  Living alone I don't need all those sweets.  

I want to wish all my followers a very Merry Christmas so I have created my own Christmas card just for you:
Merry Christmas to all and may Santa bring all your wishes for the new year.

Tuesday, December 16, 2014

Christmas Stocking Challenge Winner!!!!


It's official!!!  My Christmas stocking Noel took 4th place in the Nancy Zieman Christmas Stocking Challenge.  I want to thank everyone that took the time to vote for me.  As far as I'm concerned I received the best prize.  Seven fat quarters from Riley Blake Designs from the Christmas Collection.

Here is the bundle that arrived last evening.  But wait you can't really see the fabrics so here's a better view:
I just love them!!!! 

My Santa with his frog stocking took 6th place just 4 votes short of winning 5th place.  But that's ok I didn't do the challenge for the prizes I did it for the challenge.  I just love a design challenge.  Plus both stockings were ideas I've had for a long time.  This gave me the inspiration to actually do them to a finished project.      I love dead lines too!!!!  That's why I started this blog, to have dead lines to help me finish my work.  It's helped tremendously,  I've gotten more work done since I've started this blog then ever before.  

I'm now working on a few ideas for Christmas mini's.  I won't get them done before Christmas so I'll probably show them to you next year.  I'm also still trying to finish some older projects that have been sitting around.  I need to sit down and decide per month what I should work on and try to get it all done.    Maybe having specific deadlines will help me finish most of it.  Of course I keep getting interrupted by new ideas.  New Ideas tend to take over and yet they don't always get finished either.  It's a struggle I've always had. Oh well back to work.  I'm about to finish two mini quilts that I shared here two years ago.  Finally!!!

Merry Christmas to all!!!

Sunday, December 7, 2014

Potholder Kitchen Set

This is my post for 
FriDaY NighT with FRienDs hosted by Gone Stitchin'.  It's a fun way to spend the first Friday night of each month.  I don't always remember to register but I do sew almost every Friday.  

While I was visiting my son and his wife this Thanksgiving, I noticed that they didn't own any potholders.  I also noticed that their new dishes matched a chicken fabric I bought several years ago and couldn't find a use for it.  That started it all. 

I knew I wanted to do the oblong potholders I designed several years ago but I wanted to add to them for a full set of potholders.  I searched the web and found this site that had a tutorial for Hexagon Potholders.  Since they have a slightly oriental decor I thought they would be perfect. They went together fast and easy.  Here they are after the first round is sewn on. 
Then here they are after the second round and before cut into Hexies.
After the hexie's were completed then I cut them into finished hexie shape.  Then layered the backing, cotton Batting and Insul-Fleece by Pellon, pinning it temporarily. It is recommend by the manufacturer to put the cotton batting between thefabric that will touch the heated object and the Insul-Fleece.  I then turned this layered section over and placed the hexies right sides together with the backing fabric.  Sewed around the edges with the usual 1/4" seam allowance, leaving a 1" opening for turning.  After sewing was finished I cut around the hexies through all layers. Turned them right side out pressed  and topstitched them closed.  Then quilted in the ditch throughout the trivet. This is the final product. Too cute!!!!
I then started with the Oblong Potholders.  They are still available as a free download at Pellon Projects.  I did change how I quilted the fabric. Instead of doing several small sandwiches I made one big one.  It's still small enough to handle easily with a regular sewing machine.  
Here's the finished Oblong Potholders:
I almost finished here, then thought about the Pot Handle Holders I would love to own myself.  I again did a web search and found several ways to make them after measuring your own pans.  I wanted something more universal.  So into the kitchen I went to look at my cast iron pans and my other cooking pans.  I saw that there are some pots with short handles and some with long.  You know what that means.  I needed to make one of each.  I had extra quilted fabric left over from the Oblong Potholders so I used that to make these.  They slip easily onto the pot handles.  This is a very easy way to pick up a hot pot without the usual slipping with a flat pot holder.

Again I almost stopped here.  Then I thought that my Oblong Potholders are great for on the stove and some baking but not so great for large oven roasters or oblong cake dishes.  I hate oven mitts that are two mitts with a long length between the mitts.  It limits the user to size of pots/pans that can be used.  I also can't see the use for the middle section.  So I designed some Oven Mitts that are similar but separate.

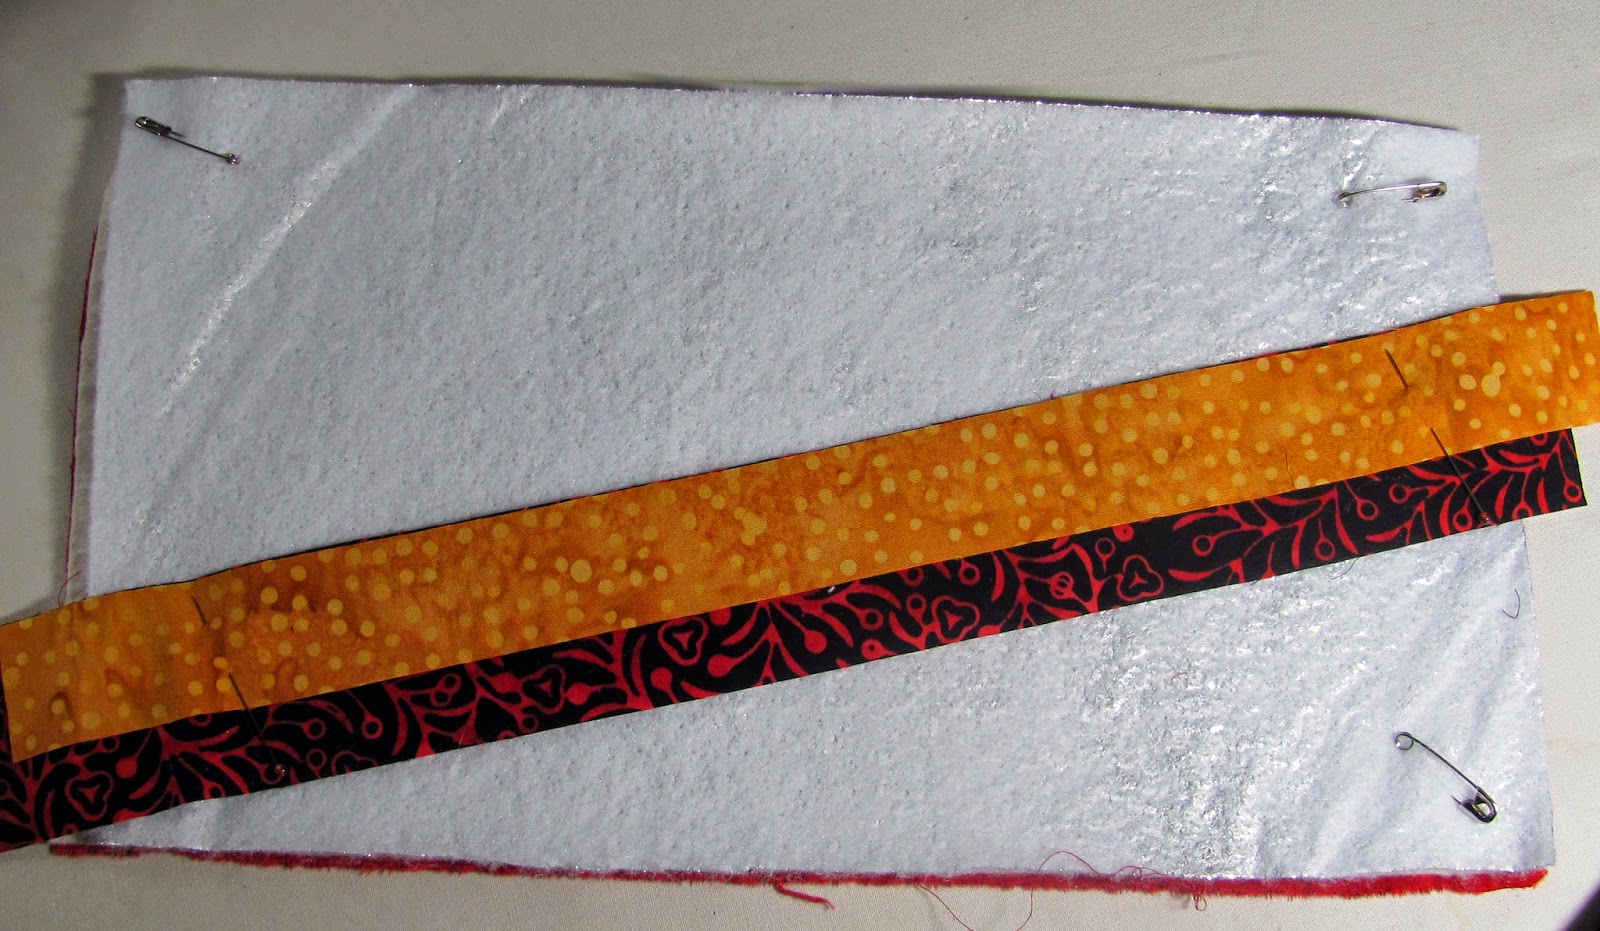
I wanted them to be different for the others I had already made but of the same fabrics.  So I started with layering the cotton batting and Insul-fleece over the backing fabric with the ride side down down. For ease of handling I pinned this layer section on the corners.  I cut several widths of the fabrics I had already used and sewing them with a sew and flip method.  This allowed me to quilt as I went along.
I used the finished quilted fabric to cut out the oven mitt pattern. I finished them with binding as with the Oblong Potholders.
Here is the finished product.  I can't wait to make my own to try them out.
Happy Holiday Cooking,

Tuesday, December 2, 2014

Christmas Stocking Challenge

I was busy with my many designs and making my annual Christmas Ornaments for my family when a friend called me about a last minute challenge.  You all know I can't resist a design challenge.  I dropped everything and started on the above stocking named of course, "Noel".   It is something that I have had in my mind for several years.  Almost 20 to be precise.  In fact I was having trouble working on it at first as I wanted it to be elegant and usually I do cute and/or humorous.  I think I created elegant.  What do you think?  Here is a closeup of the thread work done on the poinsettia petals:

Here is my second entry (we could have up to three entries).  It is named, "Santa's Delivery".  See I couldn't resist cute and humorous.  I just took a Santa I already designed and made him longer and added a stuffed frog.  Why a frog? some of you may ask.  Because I'm a froggy person not a teddy person.  So some lucky child will receive a stuffed frog and not a teddy.  he he he 

The rules were simple.  Just pick a stocking pattern from the Pellon site or the Baby Lock site and go for it. They are all pictured on Nancy Zieman's Blog and that is where you go to vote.  Voting started today and will continue unit the 8th.  Please take the time to go to this link to vote : http://www.nancyzieman.com/blog/sewing-2/christmas-stocking-sewing-challengevoting-begins/

Please go and vote


Friday, October 31, 2014

Halloween Day 2014 Design Wall

Here are the projects I've been working on to finish by today.  As you can see I didn't make it.  Some are my designs and some aren't.  Actually only two aren't but I'll take about those later.  The four on the left are mine. Three of which will be patterns for next year.  Now I'm ahead and not behind.  LOL

The paper pieced pumpkin is all finished except for quilting.  I don't know if you can tell without the eyes but the last border are snakes.  How cute is that!!  Sorry I just love when I'm successful.  The other three just need borders before they are ready for quilting.  The patterns for Toadily Pumpkin, Witchy Frog and Creepy Pumpkin will be available from Craftsy sometime this summer.  Don't go there now as I don't have anything there at this time.

Today I wanted to also share with you other peoples designs that you can make your own.  The Flying Witch is a design seen all over.  I took it a step further and added a face inside the moon.  It's barely visible as I didn't want it to take over the witch.  It is also very hard to find yellow fabrics in different shades without changing the hue.  It will be for a round pillow form so the whole thing is round.  Why the strips in the background.  Simple I didn't have enough fabric so added a strip.  Still wasn't big enough, something wrong with my math.  I then added two more as odd is always better than even.  So the lesson is there are no mistakes there are just design challenges and we can always handle that.  Don't go searching for that fabric you'll never find.  Substitute with a fabric close to the same color and disburse evenly around the quilt.  Remember odd is better then even.

The pieced witches is from Quiltmaker Sept/ Oct/2009 and is called "Any Witch Way".  Sorry it is now out of print.  I've had it on my todo list for a few years ago and I must have been one of the last to purchase it from McCalls.  Here is the link anyway.


This one is called "Candy Corn Pumpkin"  at least that's what I call it.  It is a pattern by Sonya's Snippets.  Sonya not only gives away the pattern but also has a tutorial.  I couldn't tell what size her jpeg was so I simply remade it in EQ7.  The smaller Candy corn is also available from Sonya with a tutorial.  I made the the smaller candy corn because my pillow form was a rectangle.  Then filled in with the candy corn fabric.  That's one of the elements of design; Repetition.  After the holidays I hope to do a series of post on the 6 elements of surface design.   It is what I have taught for years in my Quilting Clothing classes.   I will be using the clothing and some of my quilts as samples of the elements.

Here is a pattern that is available free on the web also.  It is a small rectangle so I just used matching fabrics to make it the size I wanted. The link I am sharing takes you directly to the free PDF.  It's fun and easy to make.

 Last but not least here is a paper pieced witch available on Craftsy free.  Here are a few other free patterns you might be interest in:
http://www.craftsy.com/pattern/quilting/other/witchs-boot/118030 
http://www.craftsy.com/pattern/quilting/other/witch-on-a-broom-a-paper-pieced-pattern/118510 
http://www.craftsy.com/pattern/quilting/other/witch-on-a-broom-a-paper-pieced-pattern/118510

http://www.craftsy.com/pattern/quilting/other/jack-o-lantern-cat-paper-pieced-pattern/112461


http://www.craftsy.com/pattern/quilting/other/cat-on-
the-moon---a-paper-pieced-pattern/112363


These quilts are all on my todo list for next year!!!!  I love them. As you know I love most things Halloween.  Be sure to go to Craftsy and download them soon.  Some of them are only available free for a short period.

Happy Halloween 2014


Thursday, October 23, 2014

HoWlinG HauNteD HoUsE Wall Quilt Finishes with last 2 Blocks

I haven't forgotten.  I've just been busy trying to get this quilt quilted so that I could applique the ghosts on.  I'm not very diligent with my quilting as I don't do it very well.  I hate not being good at something.  Everyone keeps telling me I'll get better but I don't see that happening.  It doesn't help that I usually end up with scrunched shoulders that hurt to beat the band.  Then comes the headache from being in pain and being so tense.  Oh well it's done now and so should my petty party come to an end.  I still have to bind it and add a sleeve for hanging but that can be put off until after Halloween.  I'm just so glad to be done with this quilt in time for Halloween.  Can't wait to get it hung.

 This is the next block up for sharing.  It is a Shoofly variation.  I just love the 9 patch in the middle, that's probably why I chose it.  It's simple but elegant.  Just click on the picture about and it will take you to the PDF file for download/print.  Remember to be sure you printer is set at 100% before printing.  This block as all the others in this border are 6" finished. Make 4 of these block.
 I'm calling this block Wicked Four Patch because it doesn't have a name.  I think this is the block you end up when doing a Disappearing 4 patch.  I didn't want to do that many blocks so I took it to EQ7 and recreated into a single block.  Again I love the simplicity of this block and it made great corners. Make 4 of these blocks.

Assembly is really easy.  Just follow my picture for placement for the blocks and use your knowledge of quilt assembly to put on the borders.    The last border is a solid border with corner blocks.  It is 2 1/2 inches finished, there for the corner blocks are 2 1/2 inches square finished.

I can't wait to see some of your finished quilts.  Please join my Flickr group, PecksPieces Gallery and share any finished projects you done from any of my patterns. Just click on the above highlighted words and it will take you to the group.

Well back to work for me.  I still have a few unfinished Halloween projects I need to finish in the next two weeks.  I'll be back next week to share some of those projects with you.

Have a HoWlinG Good Time quilting!!!
Marjory

Monday, October 6, 2014

HoWlinG HauNteD HoUsE Wall Quilt Continues with Log Cabin Pumpkin & Frog Blocks

 I'm back with two more blocks for the HoWlinG HauNteD HoUsE wall hanging.  The first to be presented is the Log Cabin Pumpkin, just click on the picture to download or print the PDF file.  Be sure to have your printer at 100% before printing.  Also please note that some partial sewing will be necessary and is explained in the pattern. Make 4 Log Cabin Pumpkin blocks.

Next is the Frog or Toad Block.  What's Halloween without a few toads.  This is a pretty straight forward block without any special instructions. Just click on the toad to download or print the PDF file.  Make 4 Toad Blocks.


Halloween is ToadY!!!
Marjory

Monday, September 29, 2014

More UFO's finished!!!


I've been really busy finishing up some of these UFO's I've collected over the years.  In the past I was very good on not starting something that I wouldn't finish.  I would have at least three projects at one time.  One in design mode, one in sewing mode and one in quilting mode.  That way if I became bored with one element of a project I could go on to one of the others.

I lost control of this good behavior when my family life became chaos and I'm trying to get it back.  It seemed the simplest way was to finish all those UFO's so I could start from scratch.  Easier said then done, right?

The above mini quilt is my copy of a quilt I made/designed for a swap a few years ago.  I started this one for me but never finished it.  Plus I changed it slightly.  The original (below) is smaller to fit the size requirements of the swap.  It was shipped off to my swap partner, scrapnchick over on Flickr. It also has organza ghosts.  I did't leave them off on purpose but it was for the best because
they need to be added after quilting and mine is so much more intricate.


The square spider web block is something I found on the web.  It has a tutorial here.  The only problem was that it is almost impossible to make an exact size because even the slightest change becomes a drastic change after the slicing and dicing.  It was just easier to make it the size in the tutorial and then frame it to fit my quilt.  The first border is done is sections just to add interest.  The last border is Broken Dishes done with different colorway for the corners, again just for interest.

This is also my copy of a quilt I made for another swap.  The original (below) was sent to quiltnkimmie on Flickr.  It again was smaller than mine.  Both of mine are 24" square to fit my large pillow forms.  There is just not enough wall space in my home.   
 I designed the outside border on EQ7.  I just snap a picture of my applique design and and import it into EQ7 and design around it.  The other difference is that I put a frog in my witches hand instead of a house.  The original was for a fan of Wizard of Oz.  Me, I'm a frog girl all the way.  The name of this quilt is "Take that My Pretty",  the witch likes pink like me so her frog needed to be pink not green.  So she zapped her!!


Last but not least is the block I designed for a Halloween Blog Hop. Here is the original post where you can download the Boo Pattern and learn how to applique organza ghosts.  Yes, this is bigger and the ghosts are different.  Again I wanted to fit a 24" pillow form.  I just added borders until it was the right size.  The orange border is pieced because not enough fabric.  I didn't want a detailed pieced border so I just randomly pieced it.  I almost always added the extra fabric by cutting the original fabric diagonally any angle I feel like.  Then add a strip.

The ghosts where changed because they really needed to be added after the quilting.  So I used a seam ripper very carefully and took the original ghosts off.  Then replace them with full ghosts.  Here's what it looked like before the borders and with the original ghosts.


Three more UFO's down and like 47 more to go.

May your UFO's be few!!!
Marjory

Saturday, September 27, 2014

HoWlinG HauNteD HoUsE Wall Quilt Continues with Bat Wings

Bat Wings is the first block I will be sharing with you for the HoWlinG HauNteD HoUsE Wall quilt.  It is a really simple traditional block.  When designing this quilt I decided to use traditional blocks as much as possible. So I did a  search on the web for blocks using several criteria for my search.  This is what came up with entering Bat Quilt Block.

All the blocks in this wall quilt are 6" finished.  This block can be made without paper piecing it but I have furnished the paper piecing pattern for you.  Just click on the above picture and it will take you to the PDF file for download or printing.  Again I remind you that when printing make sure you printer is on 100% before printing.  You will need 8 blocks of Bat Wings to complete this wall quilt.

I am still working on getting some of my UFO's finished and I've done very well this week.  I have finished 6 UFO's this week.  Let's have a Yahoo!!! for me.  I will be sharing several of this projects with you in the next few weeks.  I just have to formulate how I will be presenting them.  I can tell you they are all Halloween projects.

By the way sorry for being a day late on this post.  Some how I lost a day.  On Thursday I knew it was Thursday but on Friday I thought it was Thursday.  Do you have this problem or am I getting OLD.  Don't answer that, I don't want to know.

Boo to you!!!
Marjory


Friday, September 19, 2014

HoWlinG HauNteD HoUsE Wall Quilt Continues

Here it is a week later and time for the Candy Corner border.  This border comes in two parts, the border and the corner pieces.  Click Here for the border PDF file and Here for the corners.  Please make sure that your printer is set to 100%.  I noticed that some people had trouble with the pattern being bigger than the paper on the last round.  

You will need four borders and four corners for this round.  If you are using more than one background fabric make sure to do several offsetting triangles with both fabrics.  No rhyme or reason just scatter them to your liking. For a reminder of the whole quilt a picture is below.

If you enjoy pincushions don't forget to go to my tutorial page to see several Halloween pincushions.  All the PDF files are linked there. 

Keep on Howling!!!
Marjory

Friday, September 12, 2014

HoWlinG HauNteD HoUsE Wall Quilt


Halloween is almost here and it's time for some great items I have to share with everyone.  This year for Halloween I decided to do something different, instead of an applique quilt I decided to do a pieced wall quilt.  The finished size is 47" x 47".  For the fabric requirements click HERE   Don't try to duplicate these fabrics as they are from my stash and very old.  In fact the house and some of the blocks are made with a piece of hand dyed fabric I dyed myself several years ago.  I can tell you that 95% of the fabrics used were batiks.

The above picture is from EQ7 so there may have been a few changes.  I'm in the process of quilting this wall hanging and it's not ready for pictures.  Ignore the funny way the moon is showing. I had to do that in order to place it over more than one block.  There is a lot to learn in EQ7 and I still have a lot more to learn.  I usually design my applique in Canvas, a drafting program designed with an artist in mind.

In the fabric requirement PDF you will find the applique patterns without seam allowances for the moon and the oval windows.  There is also 3 ghost patterns that have not been included in this picture.  They will be applied after the quilt is quilted.  Remember my Boo block with the organza ghosts.
That's how these ghosts will be applied to the front of the house on this quilt.  You can either find the original post on how to applique organza or you can just click on the picture about to go to the PDF tutorial.

Are you ready to start on this house?  Click on the picture below and it will take you to the PDF file.
Why did I use two different back ground fabrics you ask!  Not enough fabric is the answer.  Since I'm now retired my budget is very small for fabric purchases for every quilt.  So the new rule of thumb is to make my designs without purchasing new fabric.  If I have to purchase I'm only allowed one purchase, unless of course I'm already broke that month.   Since my stash is vast this is not a problem unless I don't have the right shade of a color.  I didn't have two periwinkle fabrics that were the same shade so I kept going until I was happy with what I did.  This is easy to do if using EQ7.  You just need to scan the fabrics and import them into the program.  The problem was that I wanted the house to float into the Candy Corn border.  I felt this gave the quilt a scarier feel.

Just a warning!! This house is very easy to piece except it has a stray piece that will need some partial sewing.  That's where you just sew part of the seam, attach more pieces and finish the seam after this.  It's piece K under the eave of the top dormer.  I wish I had taken some pictures as I sewed this section but I didn't. If you have trouble with this section let me know and I will try and do some kind of demo.  

I will be furnishing you with the Candy Corn Border and Corners next week.  Make sure I keep that promise please.  lol  

Have Howling Good Time!
Marjory Peck
Related Posts Plugin for WordPress, Blogger...