Wednesday, December 25, 2013

Merry Christmas to All!

It's Christmas morning so I thought I would share the items I sent to my partner in the Santa Sack Swap.  She doesn't have a blog or website so it's up to me to post the items.  Let me tell you some of her likes first.  Her favorite color is red, she likes quilted houses, Raggedy Anne, and Gingerbreadmen.  So here is what I came up with for her 6 gifts.  This is everything but the home made jams that I sent.

Now for the individual pictures.  I'll start with the tote.  We had to make a tote or Christmas stocking, my partner asked for a tote non Christmas.   She loves quilted houses so I designed this tote just for her.
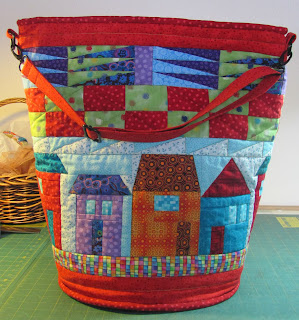
This tote is even better than mine because I found a better way to make the strap.  This strap is very strong and doesn't stretch.  Mine does, I'll give the link for this tutorial on another posting.
This picture is deceiving.  It's much smaller then it appears.  It is like 6" x 8" and made with the only gingham I own.  My partner loves gingham.  I took step by step pictures on how to make this pouch so I will make a tutorial for some time in January.
I couldn't do a swap without a pincushion so her she is.  As I've already stated my partner loves Raggedy Anne.  I couldn't make just one, I needed one too.  She's about 6" tall.  I've also taken step by step pictures of her and will share latter.

My partner also received the same ornaments that I gave my family for Christmas. There were 3 snowmen, 1 red, 1 green and this blue one.  Of course I made myself a set of these ornaments and they are hanging on my tree.  
Last but not least I made a small wallhanging just for my partner.  I designed the Gingerbread men and the corner peppermints.  The Candy cane is a free pattern on the internet but I adapted it to be longer than the original. The wrapped candy is also from the same source as the candy cane. The zigzag is double flying geese pattern done in three different fabrics.  The finished size of this quilt is 30"x30".  
I also bound this quilt differently than I normally do.  I found a tutorial on how to add piping along with the binding  and it's all machine sewn.  It worked like a charm, soo soo easy and great added interest. 

Well, that's the lot.  I know my partner was supposed to open these gifts last night.  I hope she will enjoy them as much as I enjoyed making them.  I just love the challenge of making something for someone I don't know.  

See you next year so have a Happy New Year!
Marjory

Friday, December 20, 2013

Santa Swap 2013 Opening Day

This is my last swap for 2013, it was a 6 months long swap.  Cheryl over on Gone Stitchin' organized it.  She collected everyone's names that wanted to join and then gave out the partners.  This was a straight across swap so we knew who had our name and vise versa.  We then needed to make or buy 6 gifts for our partner.  One gift had to be a tote or stocking and one needed to be a homemade gift for Christmas.  We had each others email so we could tell our partner what we liked.  Then today is the day we can open our gifts.  Some are waiting for Christmas but I'm leaving right after Christmas so I opened today.

This the the collection of gifts I received from my partner, Mary Pat.  As you can see there are several more than 6.  Oh dear, I sent 6, but in my defense all of them were made by me.  She's not opening until Christmas Eve and doesn't have a blog.  I'll post pictures of what I sent to her after or on Christmas Eve.

I choose to have a tote that wasn't Christmas so here is that tote along with a yoyo maker, a cute little Chicken Pincushion, along with pins.  There is also those great clips used when binding a quilt.  I really needed those.  I have one package and needed more.  Now how did she know that?

This next picture is the Christmas items sent to me. Mary Pat embroidered a Christmas tree and then framed it.  I'm going to really enjoy this along with the kitchen towel with the appliqued tree on it.  There is also a wood tree with a small embroidered Christmas tree decoration hanging from it.    
Here is the apple items I received.  A glass apple that is gorgious,  a small apple plate, and 2 apple placemats that Mary Pat made.  The three bottles in the top corner are a unique vase.  Can't wait to add flowers.   
This picture shows the great Halloween items I received.  You all know how much I love Halloween!! This is a piece of embroidered linen that I can make into any thing I want along with some great Halloween fabric.  I'm already thinking about what I really want to make with this great embroidery.  Look at the web in the background.  It is very intricate.  Check back to see what I decide what to do. 
Here is the last picture of various gifts, a hand crocheted wash cloth, a Charm Pack and a quilt label that Mary Pat embroidered.  I'm one lucky partner.  I just racked in some really good quality loot.  
May the New Year bring to joy, peace and love!!!
Marjory

Snowy Noel Finishes with Block 9

Christmas isn't complete without a few gifts.  I love frogs so I just had to add an old fashioned pull toy to complete this quilt.  I am also including in this post the paper piecing pattern for the candy cane 12" sashing here and the 16" sashing here.  In order to complete the quilt with my setting you will need 12 of each size with 1 1/2" finished corner stones. So make sure you cut the corner stones at 2".

The outside border is 3" x 42" and 3" x 54" finished with 3" finished corner stones.   Hope you enjoyed Snowy's journey to Christmas.  I know that I did.  I still have to sew this one together so I'll be busy for the next month or so trying to catch up.  Then I hope to do that floral quilt that I promised last year.

Have a very Merry Christmas!!!!
Marjory

Monday, December 16, 2013

Snowy Loves Antique Toys!!!! Blk 8 is here!

Only one more pattern to reveal after this one.  This is blk 8 "Snowy Toys".   There aren't any special directions for this block.  Just remember  increase the size by 159% to make the PDF pattern the right size to fit a 12"x16" background.  Now that's the finished size.  So cut your background a 12 1/2" x 16 1/2".  

I've been busy here. I've taken apart my studio and refurbished it.  I had a friend remake a 6' banquet table into a 4' recessed sewing table.  Here is the old table that was due to be trashed because the top was coming apart.  I wouldn't let anyone throw it out.  I've always tried to reuse things other people would throw out.  So I've been going green long before the craze for going green started.   It was just that the legs were perfectly good.  I originally planed on just adding a new top out of plywood and painting it.  Then I had an idea of building my own recessed sewing table.


I did some research on how to take a kitchen table and remake it into a recessed sewing table.  I didn't have an old kitchen table but felt I could pick one up at a yard sale.  Alas all the yard sales were selling the tables with the chairs and for more that I wanted to pay.  Then I remembered that old banquet table that needed to be rebuilt.  I took all my research over to my BFF male friend and had a builder to builder talk with him. 

I showed him my research and everything I liked and disliked about each rebuilt tables.  Then I asked him if he could take the 6' banquet table and rebuild it into a 4' table.  He told me it would be a snap because those old tables come apart easily and he would only have to shorten the side rails.  So that's what he did. 
Then he cut a hole that would fit my sewing machine with the slide on free arm table that comes with the machine.  He then added a lower shelf to hold the sewing machine.  He chose to make shelf the whole width of the table for strength. 
The trouble with that is that it doesn't allow access to the bobbin case.  I told him I would work with it that way and see how it works out.  Well it didn't so I've since turned the table over and cut a 3" recess it that bottom shelf.  I can now use the table and access the bobbin easily.  I'm very happy with my green recessed sewing table.  The cost you ask.  Just $50 for everything .  My friend did the work because he's my friend.  Here is a picture of the table after applying the finish but before I cut the extra 3" off the front of the shelf.  Isn't it pretty.

 
This was built over the 3rd week in October for my birthday present to and from me.  LOL  But this last week as I was redoing my studio I decided to build that shelf I've been wanting to hold more of my growing pincushion collection.  I've always loved doll making but dolls are too big and take too much room, so I've converted that need to make dolls to pincushions and am really enjoying it.

I decided that this shelf needed to be designed after a shelf I already owned.  I just needed to make it slightly bigger.  I did my math, redid my math and redid my math a third time. Then I called my BFF male friend and asked him to meet me at Home Depot.  When he got there he just asked me what we were doing now.  I told him I was building a shelf and handed him my measurements and wood requirements.  He didn't even go over my measurements.  We have worked together so much that he just went with my figures.  He's better at judging wood so that's why I had him come. 

We choose the wood and had the guy at Home Depot cut it to my specs.  Note to all you would be builders of shelves:  The width of the boards is always off by at least 1/4".  If it says 6" it is usually 5 3/4". I took one look at the 6" and said, "That's not 6 inches".  My friend reminded me that it's never 6".  I told him it wasn't 6 3/4" either.  He went and got a measure tape and sure enough it was only 6 1/2"  I was going to make my shelf with 4" boards for the shelves and 6" boards for the top and bottom.  The 3 1/2" boards just weren't big enough.  I would either have to spilt the boards or resize my shelf.  Which is what we did.  Now it's even bigger than I wanted.  My BFF told me what size screws to use and anything I was forgetting.  Now it was time to go home and build.

I won't bore you with all the details. I just need to say my BFF didn't help except on that shopping trip.  Here it is already on the wall. 

If I was making it again I would make it slightly shorter and make the shelves 6" apart and not the 7 1/2" that they are.    But now my studio has my ironing table recovered, the recessed sewing table fixed to use he bobbin case, my cutting table lowered and a new shelf for my pincushions with room to grow. 

Woodwork builds character!!!
Marjory

Thursday, December 5, 2013

Snowy Block 7 "Snowy Santa's Hat with Mouse

Snowy Noel is counting down to the finish!!!  Here is block 7 "Snowy Santa's Hat"  with two more blocks to come.  I really need to get busy as I haven't kept up with my applique as we went along this time.  I will give you the setting but it won't be tested.  There are no special instructions for block 7.

I've been busy putting up my Christmas tree and decorating for Christmas.  I ended up with two very small trees.  I love live trees but money is always short in this house so I decided to buy a 4' fake tree with lights.  Everyone was having a sale this last week so I ended up only spending $25.00.  A live tree would have been at least that much.  Then I brought out the fake baby tree that was given to me last year for Christmas.  It's about 3' and flat on the back.  No problem there I just put it in my short hallway in a corner.  I really had fun decorating these trees.

The larger on has only angels on it and the smaller one has mostly Santa's with a few snowmen.  I still have enough decorations to decorate my potted pine if I so chose.  I just need some where to put it.  I may still do it, who knows.


 Here is the Angel tree.  It's facing north so it's hard to get a good picture.  That room is always dark this time of year.  Below is the Santa Tree.  The elves are
preattatched.

Have fun decorating for the Holidays!!!
Marjory

Monday, December 2, 2013

Snowy Loves Christmas!!!!!

Snowy is back with Blk 6, " Snowy Wreath with Toy Train" in the Snowy Noel pattern give away!!!  I really wanted to post this from Memphis but the stupid Google wouldn't let me into my accounts.  They asked me stupid questions like "what month and year did you start an account with google.  What's with that?  Do you remember that?  How about years and years.  lol  Oh well it is what it is.

The only special is the reverse applique to the train windows and the large bow on the wreath.  Remember that the pattern needs to be enlarges 159% to bring it back to the 12" x 16" format.

I had a great time in Memphis with my son and his family.  He dropped two turkeys and there was hardly any left overs.  He worked on those turkeys for almost a week.  First to thaw, then came a dry brine.  After the dry brine was washed off he did an injected marinade.  Then Thanksgiving he put a dry rub on the skin before dropping them into the hot oil.  Were they ever good.  Juicy and flavorfull. I made his favorite Onion Lovers Twist by Pillsbury except I changed the flour to half whole wheat and half white flour.  My son is trying to eat without white flour.  Unfortunately this recipe was tried a few years ago 100% whole wheat and it was too dry to braid.

I'll be back by the end of this week with another block.  I hope all of you from the USA had a great Thanksgiving!!!!

Happy Holidays!!!!
Marjory

Monday, November 18, 2013

Snowy is back with a bouquet of flowers!!!

What is Christmas without poinsettias?  I just had to create this block just to add these lovely Christmas flowers.  They remind me of my mother, she loved them. So I bring you the fifth block in this series: "Snowy Poinsettias".  There are no special directions for this block.  I will add the flower centers after the quilt is quilted.  I will either put in beads or do some embroidery.  We'll see.  Just click the picture and it will take you to the PDF.  Don't forget that you need to enlarge this pattern by 159%  to make it full size.

I will be flying from Arizona to Tennessee on Sunday.  Every year my son who lives in Memphis sends me tickets to fly to him.  We will be having Thanksgiving with his wife's family in the traditional southern way.  Very different from my family's mid-western traditions but very fun and tasty just the same.  

The last two times I've been there for Thanksgiving they have had smoked turkey.  Since my son is hosting this years gathering I think he will go back to his way.  Which is to deep fry the turkey.  If you've ever had this you know how great and juicy the turkey turns out.   Can't wait!!!!

I have finished all my swaps for this year!!!  Yeah!!!!!  The last one is supposed to be in the mail on November 30th but I won't be home until that night.  So I asked for a little leeway and it was granted.  I can either mail on this Friday or the Monday after I get back.  We'll see which is more convenient.  I still have to get my clothes in order.

This job of packing has taken a left turn.  My dryer no longer dries the clothes.  It spins but no heat or air flow.  Ugh!!!  I'll have to save my pennies.  In the meantime I have to wash here and take the wet clothes to the laundry mat.  I think I will purchase a retracting clothes line to see me through until I can purchase a new dryer or have this one fixed.  It's never been served and I've owned it since September of 1992.  It's had 3 moves from house to house since that purchase.
It's worked great up until this last week. Whine, whine.

Tomorrow I have an appointment with the seamstress that will make my formal dress for my friend Maria's son's wedding.  I will be a godmother, one of like 15.  This is a big Mexican wedding and they have godparents that contribute money to help support the costs.  My other half will be my friend Johnny's brother who is the groom's step-uncle.  To my surprise one of Maria's daughters has given me the birthday present of paying for this dress.  She always honors my birthday.  She says I'm her white aunt but then again Maria and Johnny tell every one I'm their white sister. 

If possible I will be posting from Memphis with a new block. I will have my netbook with me but I need to do some cooking for Thanksgiving.  My son has asked that I make our traditional onion bread.  He's asked every year but never tells me before I leave so I can have my recipes with me.  I will take pictures and share while there, I hope.  

Happy Thanksgiving!!!!
Marjory


Monday, November 4, 2013

Snowy Noel Blk 4 Snowy Lantern with Toy Car

Snowy is back!!!  This time with a old time lantern and a wooden toy car.  Don't you just love the old toys?  They have such great character.  By my standard's today's world is too square.  I much prefer curved edges like the cars used to be. For the free PDF file just click on the picture and poof you will be at the downloading page.  From there either print the pattern or save the file to your hard drive.  I usually save PDF files because paper can be lost and can clutter up the place.  If it's on my hard drive I can print it when I need it and then only the pages I need for the pattern.  Don't forget that the pattern needs to be increased by 159% to make it full size for this quilt.

This is block 4 out of 9.  There are two features worth noting.  First the glass on the lantern is a broken line.  I did it with a full line at first and it looked funny.  So I tried it this way and liked it better. I know it this picture the glass looks blue but it is periwinkle because it is a shadow.

The second feature is that the windows on the car are done with reverse applique so that the cat and lantern can be seen through them.   For those that ask, "What is reverse applique?".  Mostly it is when you turn under the background and sew it to the applique. ie: If you sew a circle onto the background that is regular applique. If you sew the background in a circle onto the circle fabric that is reverse applique.  In this case it is reverse applique because I didn't sew on a circle of fabric but chose to turn under the window and let the background show through. This makes the circle have inside curves which are easier to sew and much smoother than a circle sew with outside curves.  I much prefer to sew circles and hearts in this manner. I hope this explanation is clearer than mud.

On the home front I am trying to complete my last swap for the year.  It is for Santa Sack Swap being sponsored by  Cheryl at Gone Stitchin'.  She is such a sport because even though she is in Australia she includes us over here in the USA.  She does a great job of coordinating this swap.  The sign up's start in June and the swap lasts from July until December.  It is a direct swap in that two people send to each other in stead of the round robin style of swap.  During the 6 months of the swap you have to make or buy six gifts for your partner.  One of the items has to be made and has to be themed for Christmas.  You have to include a Christmas stocking or tote to hold all the items.  I'm down to my last 2 gifts and I know what I'll be making.

This afternoon I will be machine quilting on the tote I've made for my partner and completing another item.  Can't say more as my partner has my blog address and don't want to let the cat out of the bag.  I love surprises and I love to give surprises.  Best part of  Christmas. Well back to quilting.

He who has not Christmas in his heart will never find it under a tree.
Marjory


Monday, October 28, 2013

FLiRTs 3 received from my partner!!!


Craktpot was my partner in the FLiRTs round 3 and I was hers.  Here is the clock that I received and this picture doesn't do it justice.  It came with two sets of hands so that I could hang it in the kitchen with a knife and fork set or with the set I attached to the clock. That black blob at the end of the second hand is a tiny mouse.  I plan on hanging in on my bedroom wall with my rouges gallery of frogs. These mini quilts are from some of the swaps I've been in.  Oops, I just noticed it doesn't have the last frog quilt I received from FLiQs.  That's because its hanging in my livingroom.  I really need to transfer it here so they can
all hang together.
This quilted clock fits right in.  Especially with the boots border and the small hand embroidered frog in the bottom left corner.  Here is that frog along with the charms attached to a bookmark I also received. Isn't he darling!!!!
Most of the partners send extras along with the quilted item for the exchange.  I received a bookmark (handmade), Rotery cutter case, 3 FQ's, some cute pink buttons, a bodkin and some great candy.  Look at that darling frog card.  I just love it.  In fact I love it all.  I've really love these swaps.
Some people ask me what I like about swaps and why I do them.  Here's my answer to that; first I need dead lines, I work really really well with deadlines.  If I don't have one I put things off, sometimes for years.  Remember that's why I started sharing my patterns here so I would have dead lines.   Second I love designing.  The hardest part of design is sometimes coming up with an idea.  This leads into the third reason.  Third I love to figure out what people love and make or buy a gift especially for them.  My daughter has always loved that about me.  She tells me I am the best gift giver she knows. Fourth I love to receive gifts.  This may sound selfish and maybe it is but I love all gifts.  When my kids where young and received a box of gifts from my mom, I wouldn't let them open the package.  I had to open the shipping box and they got to open the gifts.  I also just had to be present when the gifts are open.  I also have to watch everyone open their gifts before I open mine so that I can see everyone's reaction to all their gifts.  I guess I feel the same way about mail order, it's like getting a gift.  

“Presents are made for the pleasure of who gives them, not the merits of who receives them.” 
― Carlos Ruiz ZafónThe Shadow of the Wind
Marjory

Sunday, October 20, 2013

FLiRtS swap completed, sent and received!!!

FLiRtS is a swap group on Flickr.  The initials stand for Fab Little Random Treasure Swap.  This is a very unique swap as you get to choose the level you want to work Simple, Medium, and Fancy.  Then choose five items from a list. You don't know who your partner is and you don't know which item your partner will decide to make for you.  Your partner will probably post pictures to tease you as they work. I only posted this:
I was afraid if I posted more my partner would know what it was and who it was for.  She did tell me when she saw this picture she was suspicious.  She also admitted that I am her partner also which they don't usually do.  But when I saw this picture she posted I thought it might be her:
It's the start of a fabric clock and I can't wait to see the final.  I'll post it here when I finally receive it.  It should be sometime next week as it's already in the mail.

Back to what I sent.  The major item was a sewing machine cover made with the pattern "The street where I live".  I adapted it to include trees so that the design goes completely around the sewing machine.  She had furnished the dimensions of her sewing machine.
For extras I made a small pouch with a flower design and a sugar skull pincushion.  I am sharing the pattern of the sugar skull with my readers.  It is a really fun and easy pincushion to make.  You can see that I had to make one for myself as usual.
If you want to download the free pattern just click on the picture of the sugar skulls and it will take you to the PDF.  I will share the flower pouch a little later.

Sugar skulls are fun!!!
Marjory

Tuesday, October 15, 2013

Snowy Noel Block 3 Snowy Candles

I've been so busy with some of my swaps that time just slips away!!!  Better later then never.  Here is block 3, "Snowy Candles",  just click on the picture and it will take you to the free PDF file.  There are no special directions for this block.

Have you noticed this button on the right side of my blog?
Click on it and it will take you to Peckspieces Gallery on Flickr.  This is a group page for anyone that has made anything from one of my patterns so that we can all share in their work.  You will have to join Flickr and join the group to upload any pictures.  There are a few items already there; Threads of love shares her "Spooky Pumpkins" mini quilt; ljordan shares her 7 blocks of the Flutter series; and fibberbabble shares how she used crayons to create a mini quilt using the "Spooky Flowers" pattern.

I want to thank everyone for their interest in my work and I would love you to join with these ladies to share your work on Peckspieces Gallery.  I also want to thank these three ladies for being brave and being the first ones to share on this gallery. It's always scary to be the first few.

Here is sneak peak of a wall hanging I'm working on for Halloween. This is the center block and is about 24".  There will be more fun to come. Finished size so far is 46".

When the top is done I will be sharing the patterns for the entire wall hanging. This entire quilt is all pieced except the circles and ovals here.  The rest of the blocks are not original to me but are traditional blocks done up for Halloween. 

I have also been working on a new pincushion for Halloween.  It is a Sugar Skull and it's darling.  I will share this sometime before Halloween.  There are two quilts using Halloween fabrics in a fun way.  The second top should be done sometime this month and I will be posting them here.

I am also working on several items that I will share sometime in December as they are for Christmas and part of a swap so no hints.

Well back to work to get all these items finished this month.  I'm doing pretty well and that is why I not on here more.  

Halloween is almost here!!!

Marjory


Friday, September 27, 2013

Snowy Noel Continues with Block 2, Snowy Toy Soldiers


Sorry for not posting sooner but I've had a nasty virus and been in bed for the better part of a week.  Hope I don't make any errors posting this.  My brain is still not functioning very well as of yet.  Sorry also for the wrinkles but that's life right now full of wrinkles.

This is nothing out of the ordinary about this block, except it's one of my favorites.  I just love this tiny toy soldiers all wound up and ready to preform.  I will be adding seed beads for the eyes after quilting.

I will try and come back sometime next week with the 3rd pattern to try and catch up.  They are all drawn they just need to be made into PDF's.  I hope to be back on track by then.  I need to finish several swaps I'm in the middle of.  Luckily I'm ahead in that direction so this time off won't hurt too much.

Hope you all enjoy the Toy Soldiers!!
Marjory 

Sunday, September 1, 2013

Snowy Noel Pattern Giveaway Begins!!!!

Whoopeeeeee!!!!   The applique is all glued and ready for sewing.  I have made a mock quilt in EQ7 and this is what I came up with.  Hope you like it.  I do have to say that the pictures came out a little on the green side.  the background isn't light aqua it's light blue.  I have created a supply list in PDF form, just click on the above picture and you will be transported to the download page.

Block 1 is Snowy Stocking, just click the  picture below for transportation.
The only special instructions are about shading and shadowing.  To shade or not to shade that is the question.  While working on this quilt I was very disappointed that the white cat didn't pop like the black cat in Spooky Hallows.  I did what most of us do I whined to my friends.  My BFF in Vancouver, Wa told me to shade one side with what ever color I choose and it should pop.  Well, I shaded it in medium blue because the background is light blue.  Wrong, wrong, wrong.  Then I spoke to my BFF in Texas, who taught a color class for quilters for years.  She told me that BFF Vancouver was right but that I should use 1 color down on the color wheel 1-2 shades darker than the background.  

If this sounds like Greek to you don't feel bad.  I've been quilting for over 30 years and have taken several color classes in quilting and water color and have never heard this.  Well I made her explain it better and told her she needed to write lessons on color on her blog which she promised me she would do.  I will nag regularly until she does it.  So let me introduce you to BFF Texas:  Alexandra Henry,  http://blog.artbyalexa.com/ , she is currently a freelance graphic artist working with Pellon.  She has many free designs on the Pellon website  http://www.pellonprojects.com/.  She is a master embroiderer and has been designing quilts for many years.  Check out her blog she has several very interesting lessons on applique and embroidery.

So back to shading and shadowing.  First shading is a line of color behind the subject to make colors show better.  Shadowing is just like our real life shadows and is much larger that shading.  Here is what she told me:  

Shading and highlighting color:  Shading or shadows should be 1 color down on the colorwheel  ie:  blue background should be shadowed in blue violet 1 or 2 shades darker then the blue. 
Highlights should be a color up on the colorwheel.  ie: blue should be highlighted with green. Highlights colors are chosen from the subject not the background. Use 24 color colorwheel  I am attaching a copy of an old 24 color colorwheel
This color wheel is from 1908 and some of the color names are different but most aren't.  Alexandra told me she has her own that she will share with us when she starts writing the lessons.

I have included the shading templates in the design but they won't be necessary unless you have trouble with the cat as I did.  If I had used a darker color for the background it wouldn't  have needed shading.  But if I had used a darker background then the other colors would have been wrong.  White is just a hard color to work with unless you are using a very dark background.  

Noel is Here!!!
Marjory

Monday, August 19, 2013

Muddle of Mice Tutorials finally Here

I have finally finished the tutorials for my Muddle of Mice.  I do have to say that I was very neglectful of taking pictures during the making of these mice.  I'm afraid some of my tutorials have pictures of the bees because of this.  I guess I was too worried about getting everything done before my sisters birthday.  Which I missed by about a week anyway.  

I don't have pictures of the items separately so I'll just list the items and post a link to the PDF's from there.  Here we go:
Muddle of Mice Pouch
Muddle of Mice Pincushion
Muddle of Mice Thimble Keeper
Muddle of Mice Needle Keeper
Muddle of Mice Scissors Keeper
Here is the only picture of one of the Muddle of Mice, it's the needle keeper. Turned out very cute.  Note I made all my mice blind no particular reason just liked them that way.  If you want sighted mice just add 1/4" black buttons to your list of materials and maybe 1/2" for the pouch.
Just to let you know I have started on the Snowy Christmas quilt and am almost half way through with the prep work.  I should be able to start sharing the PDF files in the next two weeks.  I'm just 2 months short of my original personal deadline.  Oh well life goes on and things change.  

Here's to a Muddle!!!
Marjory

Monday, July 15, 2013

The Swarming Bees are done!!!!


I just now completed the tutorial/pattern for "The Swarm Bee Pouch".  Aren't you proud of me.  Writing directions just isn't a favorite part of sharing my designs.  LOL  Just click on the above picture and it will take you to the free PDF.  Note it all.  I'm giving you the size I made but I feel that it should be a touch bigger.  The other part of the kit just fit, but there is no room for thread or any extras.  I think I would have made it at least a inch bigger if not more.

I've been keeping busy with things like the house flag quilt of which I will share more later.  I've taken a small job of programs for my small quilt Chapter and the flag will be one of the things I hope to teach them next year.  Programs just involves having a quilt project to teach every month.  I don't have to do them all but a few.  The house flag is something I've wanted to do for years.  Actually there used to be a pattern like 30 years ago.  It's not like mine but it's the one that gave me the idea.

I've also set up a second machine and station for learning how to machine quilt.  I've been quilting since the 70's but don't machine quilt.  I've cut 28 sandwiches and am told that if I practice 10-15 minutes a day that I should be fairly good before 30 days.  I've been told this by two old friends that both know my skills and are both very good at machine quilting.  We'll see!  As most things that I want too much, it scares me.  I've yet to sit down and quilt.  I have promised myself that I will do it starting tomorrow.  I set up the extra station today so no more excuses.

I've also started making the templates for the Christmas Applique Quilt that I've promised to share with every one.  It is is the same vein as my Spooky Halloween quilt with a white cat instead of a black cat.  Here is a tease:
Things may change if the color layout doesn't work.  Facts of life, not all designs work out colorwise. As I said I've just started cutting the templates.  I have three done so far and will do more tonight.  I do them at night because that's the best time to use a light box.  I also gives me something to do while watching my favorite tv shows.  I hope to start sharing the patterns by the end of this month and have the quilt done in time for Christmas!!!  That would be 2 blocks a month.  I think I can handle that!!!!

Christmas is coming!!
Marjory

Saturday, July 6, 2013

FriDay Night With FrienDS for July

This month I joined with a world wide group of friends, FriDay Night With FrienDS,  to sew together alone.  We all spent Friday sewing and then share our results.  We go blog hopping to each others blogs to see what everyone else has done.

I started early on Thursday cutting out my fabrics so that I could really sew on Friday.  Here is how I started:

Sewing together the first two sections on the cream colorway.  After they were sewn and pressed.  I lined up all the cream sections to be sewn.  Can you tell yet what I am making?  Not telling yet.


Here are the next sections ready to be sewn.  Now you maybe tell what I'm doing for blocks.

Above are all the cream blocks finished.  Now you can tell it's houses, tiny little houses.  But two more color ways to be sewn.  Bet you can't tell what the finished layout will be or can you?

Red and Blue colorways ready to be sewn.  Below all the blocks completed and
laid out in final rows waiting for sewing.  Now you tell it's a flag!!!!  Happy 4th of July all you United States Americans.  I've always wanted to do a house flag.
I have some great fabric for some borders so stay tuned to see the finished top.
I want to thank Cheryll at Gone Stitchin' for hosting this great monthly party, FriDay Night With FrienDS .


Keep sewing with friends,
Marjory 
Related Posts Plugin for WordPress, Blogger...